Cabinet Refinishing San Jose CA is one of the fastest and cheapest ways to freshen your kitchen. But it’s also important to understand how to refinish for durable results properly.
Stains work best on natural wood doors and cabinets. Stains are translucent and highlight the natural grain. Be sure to experiment with stain colors on a sample piece before committing to the project.
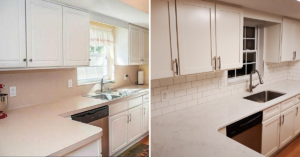
Cabinet painting can be a quick and affordable way to refresh your kitchen. Depending on the condition of your cabinets and your style preferences, you can paint them a brighter color or even whitewash them for a more neutral look. However, it’s important to remember that this is a permanent decision, so be sure you really love the color you choose! If you’re you’re not sure, it might be worth putting in the extra effort to test a few different shades in your space.
It’sIt’s also critical to use quality paint and supplies for a long-lasting, smooth finish. Cheap, low-quality paint will result in chips, streaks and other imperfections that will quickly reveal themselves. In addition, using an incorrect brush or roller can lead to unsightly visible brush marks. Investing in high-quality tools will make the world of difference in the final product. A chiseled sponge applicator and a mini roller are good options for getting into tight spaces.
Another mistake is not preparing the surface before painting. A thorough cleaning with a degreaser is a must, as well as sanding to remove any gloss or sheen from the existing finish. A light sanding will help the new paint adhere properly and ensure the best results. If you skip this step, your paint job will likely last only a few years before it begins to peel and chip.
Painting can highlight surface texture issues, such as raised grain or knots in the wood. If you have these problems, it’sit’s a good idea to repair them with wood filler and sand again before attempting to paint over them.
You’llYou’ll also want to label all of the hardware as you remove it, so you know where it goes back when you’reyou’re finished. This will save you a lot of time when it comes time to reinstall everything!
Finally, be sure to give yourself a few days to live with the new color before making any decisions about repainting. You don’tdon’t want to go through all that work to end up with a color you hate!
Stain enhances the natural beauty of cabinetry by bringing out the wood’swood’s distinctive grain and markings. It also gives cabinets a warm, inviting look that many homeowners appreciate. Stain is less expensive than paint and can add a touch of elegance to an otherwise plain kitchen.
Before staining cabinets, thoroughly clean them. Since this is a food-preparation area, use something more than just plain water to scrub them down, such as trisodium phosphate, or TSP (view recipe). This cleaner can be purchased in liquid form from home improvement stores. Follow the manufacturer’smanufacturer’s instructions for application and for a safe work environment.
After cleaning, sand the surfaces of the cabinets to give them a smooth surface that will accept stain. This is especially important if the existing cabinets were previously painted, as you’ll you’ll need to strip the old finish before applying the new stain.
You can choose from oil-based, water-based or gel stains. Oil-based stains tend to have a more consistent color and will last longer than their water-based counterparts, which may fade sooner. Gel stains do not soak into the wood, but instead sit on top of it, which can be good for less porous types of wood, such as maple. Once you’ve you’ve selected the stain you want to use, apply it according to the product instructions, and then allow it to dry completely. It’s usually necessary to apply at least two coats of stain in order to achieve the desired color and consistency. Between coats, lightly sand the surfaces of the cabinets and wipe them down with a lint-free cloth to remove any dirt or debris that might have built up between.
Before reinstalling the cabinet doors and drawer faces, apply a polyurethane top coat to help protect the stain from normal wear and tear. The best way to do this is to apply it with a brush, just as you would paint. After allowing the polyurethane to dry, you can then re-hang your cabinets and install the hardware of your choice. When done, you’ll you’ll have a beautiful, updated kitchen that will complement any style of decor.
A thin layer of authentic wood adhered to a substrate, veneer offers the aesthetics of natural wood in a cost-effective and durable form. Unlike solid wood, which is prone to warping and peeling, veneer is less susceptible to these problems thanks to the particle board that supports it. Because of this, veneer is a popular choice for cabinet refacing projects.
Veneering your cabinets is a great way to add a custom look without the expense and time required to rebuild them. Most people who choose to reface their cabinets use wood veneer sheets, which are available in a wide variety of species including oak, hickory, teak, eucalyptus and palisander santos. These veneers are typically made of renewable natural materials and can be stained or painted to match the colors of your existing kitchen.
There are a few things to keep in mind when using wood veneers. First, they are prone to water damage, especially if left unsealed or unprotected. To prevent this, make sure you apply a good quality clear coat of polyurethane to your cabinets. Also, if you want to stain your cabinets, it is recommended that you test the color on a small piece of the material and allow it to dry before applying it to your cabinet doors.
Another issue with wood veneers is that they can be vulnerable to chipping along the corners and edges of the door. This is not a major problem, but it does highlight the need to be vigilant about noticing any damage on your cabinet doors and having it repaired immediately. Another concern with wood veneers is that once they are damaged, they are not repairable the same way that solid wood cabinet doors can be.
Like most other DIY projects, installing wood veneer requires a bit of effort and the right tools. The most important tool is a woodworking saw, but you can also use a good utility knife and a straight edge to help with the cutting. It is also a good idea to score the paper backing of the veneer twice or more with your utility saw before cutting through it to make for cleaner cuts and reduce wood grain tearout. A veneer roller will help you roll out any air bubbles and make the finished surface even.
Cabinet refinishing is a great option for anyone who wants to revamp their kitchen but doesn’t want the hassle of replacing or installing new cabinets. Refinishing involves keeping your existing cabinet boxes, but changing their exterior color or finish by sanding or chemically stripping the current paint or stain. This process isn’tisn’t available for those with cabinets made from laminate or thermofoil, as these materials can’tcan’t be sanded or stripped.
A cabinet refinish is also less disruptive than a full remodel or replacement, which can leave you without a functioning kitchen for weeks on end. In addition, refinishing is much cheaper than completely replacing your cabinets, which can run up to 70% more expensive.
If you’re you’re looking for a high-end, luxurious look to your kitchen space, consider adding custom panel-ready appliances. These appliance options allow you to hide your refrigerator and dishwasher behind a panel that matches the rest of the cabinetry, creating a seamless, uniform design for your entire kitchen.
Custom panels are available in a wide variety of designs and thicknesses. Single-faced wood art panels are the lowest cost, but are more susceptible to warping with size, and are best suited for smaller panel sizes under 48″”. Double-faced wood art panels are available in both spruce and maple and are a good choice for larger panel sizes. Panels can also be made out of wood composite or aluminum. These panels are more stable and can be anodized after milling to eliminate the silver edge seen on un-anodized aluminum.
Panels can be cut to a variety of shapes and specifications, including round, beveled, or square. They can be trimmed to the exact dimensions of your cabinet boxes, or they can be left oversized and applied to the box edges later. If you’re you’re working with face frame cabinetry, apply the stiles (vertical strips) and rails (horizontal strips) first, leaving them oversized. Then trim the excess veneer to flush the rails and stiles.
Whether you’reyou’re interested in cabinet painting, staining or refacing, we can help. We have the expertise, tools, and products to make your project go as smoothly as possible. Contact us today to find out more about what we can do for you.